
How to Coordinate Flooring Throughout Your Home
INTRODUCTION
AFFILIATE DISCLOSURE: This post contains affiliate links. If you purchase through these links, I may earn a small commission at no additional cost to you. I only recommend products I genuinely love or would use in my own designs. This post is not sponsored, and all opinions are my own.
RENDERING DISCLAIMER: The images in this post are digital renderings created to illustrate my original design concepts. They are intended for inspiration and visualization and may not represent exact dimensions, materials, or construction details. See my full Disclosure & Disclaimer Policy for more information.
Why Flooring Coordination Matters
Flooring coordination matters because flooring is one of the largest continuous visual elements in a home. When floors relate well from room to room, the entire house feels more intentional, spacious, and cohesive.
A few reasons it makes such a difference:
Creates visual flow: Coordinated flooring helps rooms feel connected rather than like completely separate design decisions.
Makes a home feel larger: Fewer abrupt flooring changes allow your eye to travel through the space without interruption.
Controls undertones: Flooring has strong warm, cool, red, yellow, gray, or neutral undertones. Those undertones affect how cabinetry, paint, countertops, rugs, and furniture look beside it.
Prevents a patchwork effect: Too many unrelated woods, tiles, colors, or patterns can make a home feel visually fragmented.
Helps transitions look intentional: When flooring does need to change—like hardwood to bathroom tile—the materials should still relate through color, tone, scale, or overall style.
Establishes the home's foundation: Because flooring is expensive and relatively permanent, it's usually better to coordinate other major finishes with it rather than treat it as an afterthought.
Step 1: Start With Your Lifestyle
Lifestyle should influence your flooring choice before aesthetics because flooring is one of the hardest-working surfaces in your home. A beautiful floor that can't handle the way you actually live will quickly become a source of frustration.
Before choosing a color, pattern, or material based on looks, think about what that floor will experience every day. A home with pets, young children, frequent entertaining, or heavy foot traffic may need something highly durable and easy to clean. A quieter household might have more flexibility to choose materials that require additional care. Moisture, muddy shoes, scratching, spills, sunlight, and even how often you're willing to clean or maintain the floor should all influence the decision.
The room matters too. Flooring that works beautifully in a bedroom may not make sense in an entryway, kitchen, laundry room, or bathroom where water and wear are greater concerns.
Once you've narrowed your choices to materials that actually support your lifestyle, you can make the aesthetic decisions—color, plank width, pattern, texture, and finish.
A good flooring choice shouldn't just look beautiful on installation day. It should continue to look good after you've actually lived on it.
Think about:
Do you have pets?
Do you have children?
Do you entertain often?
Do you prefer low maintenance?
Do you expect high foot traffic?
Step 2: Decide Where Flooring Should Stay Consistent
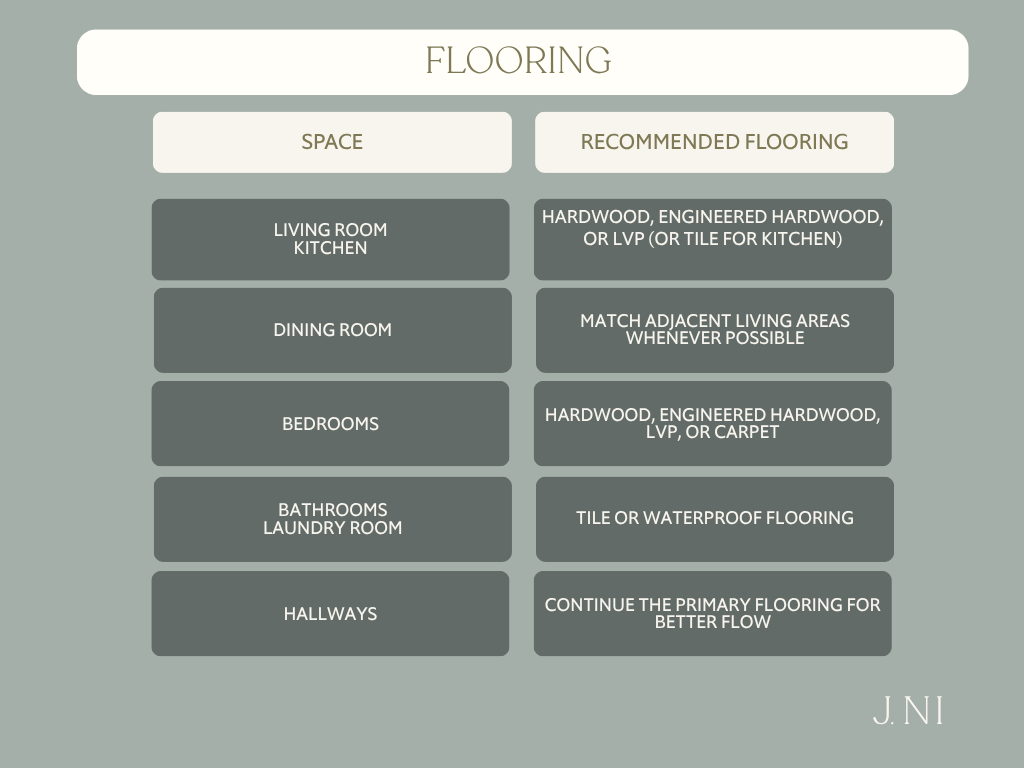
Using one flooring throughout creates the best flow when spaces are visually connected and have similar functional needs. Continuing the same hardwood, engineered wood, or other material through an entry, living room, dining room, kitchen, and hallways can make the home feel larger, calmer, and more cohesive. This is especially effective in open-concept homes, where unnecessary flooring changes can visually break up an otherwise continuous space.
Main living areas
Open-concept homes
Open kitchen / dining
Changing flooring materials makes more sense when the function of the space changes. Bathrooms, laundry rooms, mudrooms, and other moisture-prone or high-wear areas may benefit from tile or another water-resistant material even when the surrounding rooms have wood flooring. Bedrooms may use carpet for softness and comfort, while an entryway may need something more durable.
Hallways
Bedrooms
Bathrooms
Laundry rooms
Step 3: Choose a Flooring Material
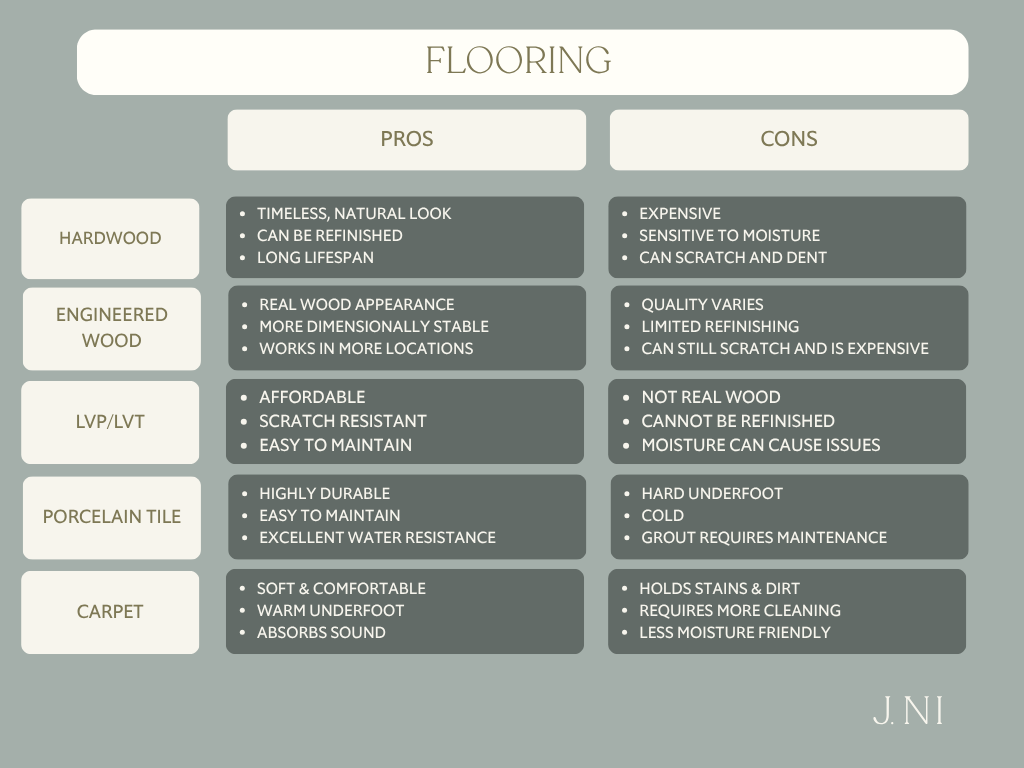
Flooring materials vary widely in appearance, durability, maintenance, comfort, and cost, so understanding the basic options can help you narrow down which materials make sense for your home before focusing on aesthetics.
Solid hardwood is made from solid wood and offers a timeless, natural appearance. It can often be refinished multiple times, giving it excellent longevity, but it can be susceptible to scratches, moisture, and changes in humidity.
Engineered hardwood has a real-wood veneer over a layered core. It provides the look and feel of hardwood with greater dimensional stability, making it suitable for more applications than some solid woods. Quality and refinishing potential vary considerably by product.
Luxury vinyl plank or tile (LVP/LVT) is designed to replicate materials such as wood and stone while offering excellent water resistance and relatively easy maintenance. It's a practical choice for busy households, although quality and realism can vary.
Laminate uses a photographic design layer to mimic wood, stone, or other materials. It's generally affordable and resistant to everyday wear, but traditional laminate can be vulnerable to moisture, so water-resistant ratings are important to consider.
Porcelain and ceramic tile are durable, easy to clean, and particularly useful in bathrooms, laundry rooms, entries, and other moisture-prone areas. Porcelain is typically denser and less porous than ceramic, while both are available in an enormous range of styles.
Natural stone includes marble, limestone, slate, travertine, and other naturally occurring materials. Stone provides unique variation and character but can require sealing and more specialized maintenance depending on the material.
Carpet provides softness, warmth, sound absorption, and comfort underfoot, making it particularly popular in bedrooms. Fiber type, pile, density, and construction all influence its durability and maintenance requirements.
Other options, such as cork, bamboo, concrete, and terrazzo, can work beautifully when their specific performance characteristics suit the space
Step 4: Coordinate Wood Tones
When choosing wood flooring, consider how its tone and undertones relate to the other wood finishes in your home, including cabinetry, furniture, doors, and millwork. Your woods don't need to match—in fact, a little variation often creates a more collected look—but they should feel intentional together. Pay attention to whether woods lean warm, cool, neutral, red, or yellow, and avoid combining several nearly identical wood tones that look like an accidental mismatch.
There’s much more to successfully mixing wood finishes, but the key takeaway for flooring is simple: coordinate, don’t match.
If you want to know more about mixing wood tones, I have an entire post dedicated to that. You can read it here:
Step 5: Think About Pattern and Scale
The pattern and direction of your flooring can have a surprisingly big impact on how a room feels. Straight-laid planks create a classic, streamlined look and can visually lengthen a space, while wide planks tend to feel calmer and more expansive because there are fewer seams and visual breaks. Narrower planks introduce more lines and can create a busier, more traditional appearance.
More decorative layouts, such as herringbone or chevron, add movement, character, and visual interest, making the flooring more of a design feature. Because these patterns naturally attract attention, they often work best when the surrounding finishes are given enough visual breathing room.
Tile works similarly. Large-format tile generally creates a cleaner, more continuous look with fewer grout lines, while smaller tiles and intricate patterns add texture and detail.
The key is to think about how much visual movement you want from the floor. A simple pattern allows other elements to take center stage, while a more intricate layout can make the flooring itself a focal point.
Step 6: Plan Flooring Transitions
Thoughtful flooring transitions are important because they help different materials feel intentional and connected rather than abrupt or pieced together. A poorly placed transition can visually divide a space, while a well-planned one allows each flooring material to serve its purpose without disrupting the overall flow of the home.
Whenever possible, place flooring changes at a natural architectural stopping point, such as a doorway, threshold, or opening between rooms. Avoid switching materials randomly in the middle of an open space simply to define different functional zones.
For the cleanest transitions, consider:
Floor height: Keep adjoining materials as close to the same finished height as possible.
Color and undertones: The materials don't need to match, but their tones should complement one another.
Pattern and direction: Consider how plank direction, tile layout, and grout lines meet at the transition.
Transition pieces: Use thresholds, reducers, T-moldings, or other profiles when necessary, choosing the least visually intrusive solution appropriate for the materials.
Placement: Ideally, the transition should align with an architectural element rather than appearing arbitrary.
The goal is for the transition to feel like a deliberate boundary between materials—not a line that draws unnecessary attention to itself.
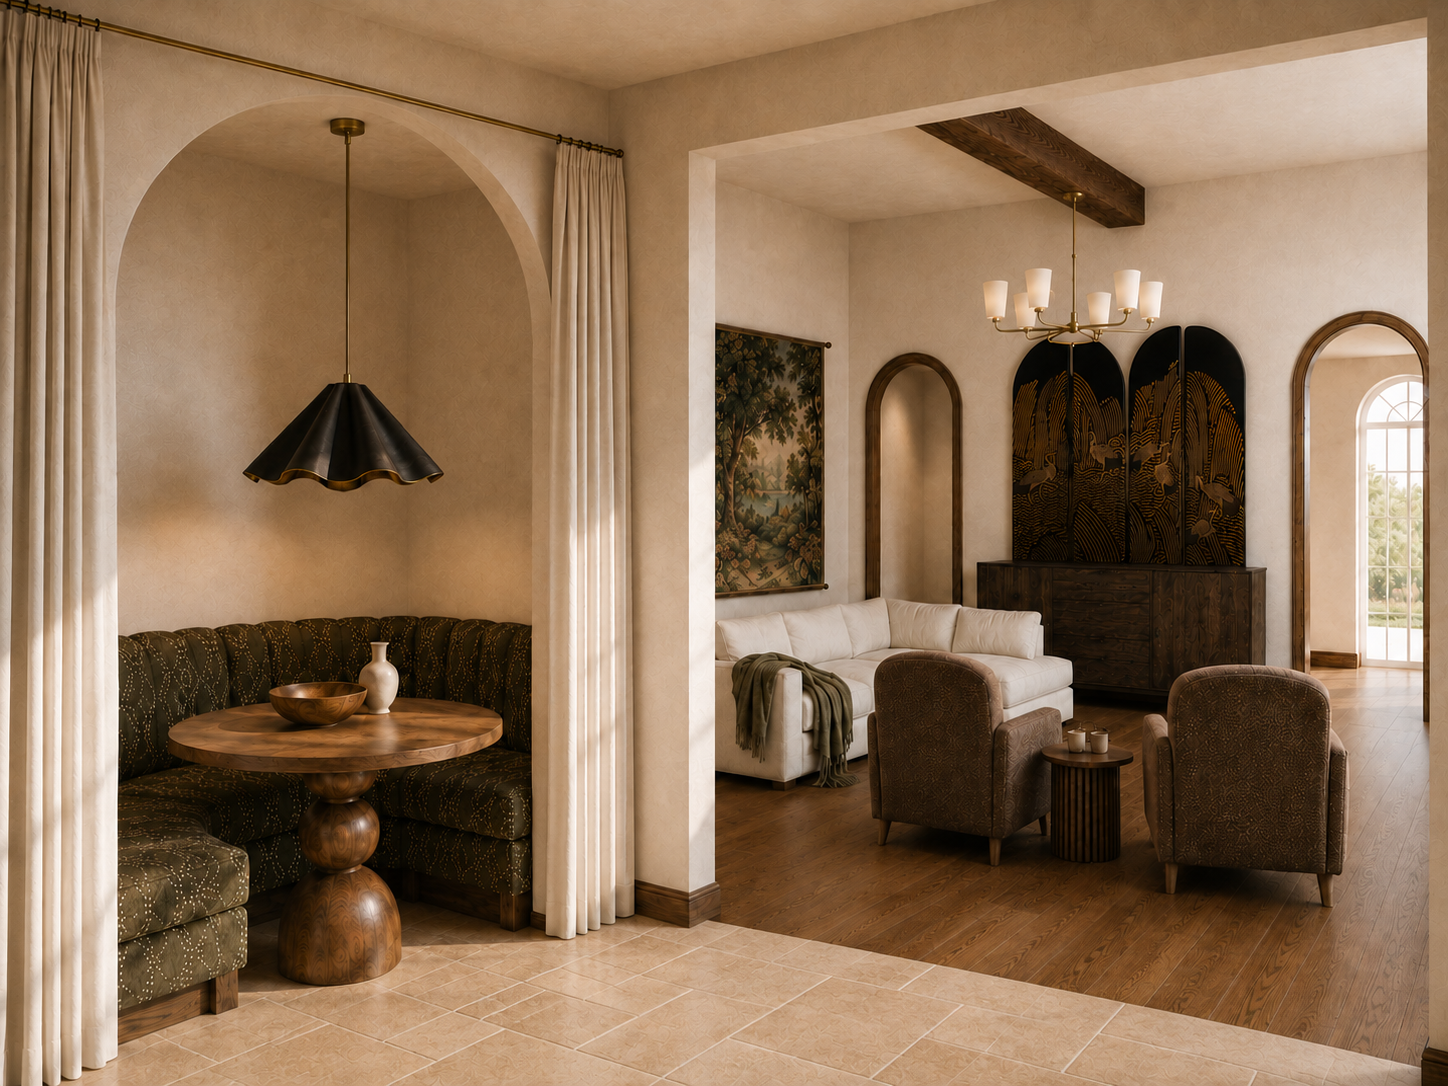
Flooring Transitions
A digital rendering showing a tile floor transitioning to a wood floor. As you can see, when you transition flooring it automatically gives an edge to the room. If you want a more of an open concept, consider using the same flooring throughout the rooms.
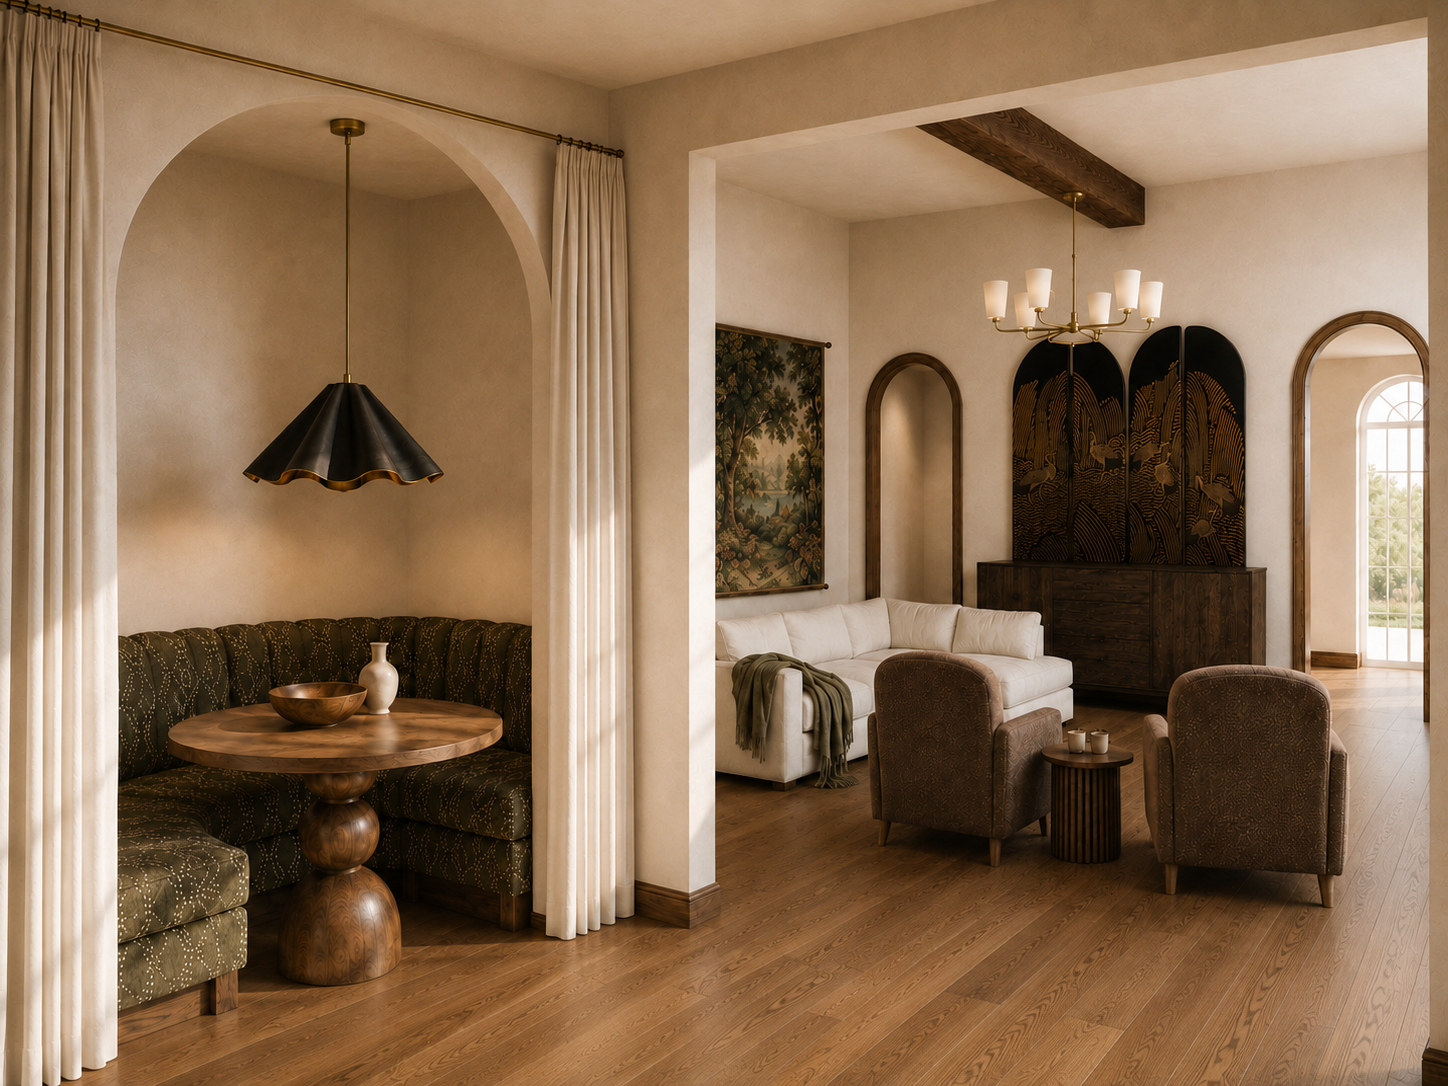
Hardwood Floor
A digital rendering showing a wood floor throughout an open floor plan.
Step 7: Coordinate Flooring With the Rest of the Home
Flooring should feel like part of the home's overall finish palette, not a separate decision. Because it covers so much visual space, it often acts as the foundation that connects cabinetry, countertops, paint, tile, furniture, and other finishes.
Start by identifying the flooring's undertone. A warm oak floor, for example, will interact differently with cabinetry and stone than a cooler or more neutral wood. Your finishes don't all need to share the exact same undertone, but they should feel harmonious rather than unintentionally competing.
A few things to consider:
Cabinetry: Coordinate wood tones rather than trying to match them exactly. Creating some contrast often looks more intentional than choosing two woods that are almost the same.
Countertops & stone: Look at the underlying warm, cool, creamy, gray, or earthy tones in the material and make sure they relate well to the floor.
Paint: Always sample paint alongside the actual flooring. Floors can make the same paint color appear warmer, cooler, lighter, or darker.
Tile: Consider color as well as pattern and visual movement. If your flooring has prominent grain or variation, a quieter tile may create better balance.
Metal finishes: Hardware and lighting don't have to match the flooring, but their warmth can help reinforce the overall palette.
Furniture: Especially with wood flooring, introduce intentional contrast between the floor and wood furniture so everything doesn't blend together.
Rugs & textiles: Use these as an opportunity to bridge colors and undertones found throughout the room.
Most importantly, look at your finishes together before making final selections. Put physical samples of the flooring, cabinetry, countertop, tile, paint, and other major finishes next to one another in the home's actual lighting.
The goal isn't for everything to match. It's for every finish to feel like it was chosen as part of the same story.
Common Flooring Mistakes
Include:
Too many flooring changes
Mixing warm and cool undertones unintentionally
Choosing flooring before fixed finishes
Ignoring transitions
Using small samples only
Following trends over lifestyle
Selecting different plank widths throughout the house
Forgetting to consider natural light
Designer Tips for Coordinating Flooring
Keep the number of flooring materials to a minimum.
Let one flooring type dominate the main living spaces.
Repeat undertones throughout the home.
Think about sightlines between rooms.
Bring flooring samples to every finish selection.
View samples in your home’s lighting.
Choose flooring that compliments your architecture, not just current trends.
Conclusion
The best flooring plan isn’t about making every room identical—it’s about creating a home that feels connected. By limiting flooring changes, coordinating undertones, planning thoughtful transitions, and choosing materials that suit your lifestyle, you can create a home that feels cohesive, timeless, and beautifully designed.
